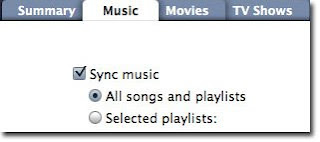
Vào Edit menu trên itunes, chọn Preferences/Advanced/Chọn copy files to itunes music folder when adding to library
Chọn bài cần thêm, bấm phải chuột vào Get info:
Thêm lyrics
Thêm artwork nhấn vào artwork
1. Chọn New Playlist hoặc (+) góc trái iTunes window để tạo new list
2. Ở Source list, "untitled playlist" sửa lại theo ý muốn
3. Chọn Library ở the Source list trong music library.
4. Để add songs đến playlist, chọn bài hát kéo thả vào playlist mới tạo.


5. Chọn Apply.
6. Để chuyển tay music, audiobooks, movies hoặc TV shows vào ipod, chọn 1 trong những thư mục trong LIBRARY ở phần Source list.
7. Chọn và kéo bái hát trong phần music (bạn muốn chuyển vào ipod) thả vào ipod của bạn trong phần Source list. Để chuyển 1 playlist vào ipod thì kéo playlist bạn muốn chuyển ở phần Source list và thả nó vào iPod giống như chuyển 1 bài hát.
Khi hoàn tất bạn có thể ngắt kết nối bằng cách chọn nút eject trong phần source list.
Một số thủ thuật trên iPod
"_locked" thành "_unlocked" xong
2. Reset ipod (sử dụng khi máy bị treo, không phải restore nhe)
- Nhấn tổ hợp phím menu+enter giữ khoảng 5s máy sẽ khởi động lại.
3. Cách cài pass cho ipod (có pass mới mở máy lên được)
-Main menu/extras/screen lock/set combination/ đặt 4 số và hãy nhớ
__________________
With QuickTime 7 Pro, you can create your own videos that will play on the new iPod. Already have great home movies you want to play on your iPod? No problem. QuickTime 7 Pro helps you easily convert them to a format that iPod understands.* Just follow these easy instructions and you'll be watching your own video on your iPod in no time.
Step 1
Make sure you have updated your QuickTime software to version 7.0.3 or later. If you don't have QuickTime 7.0.3 installed,get it now.
Step 2
Open QuickTime 7 Pro. If you don't have it, get QuickTime 7 Pro today.
Step 3
Choose "Open File..." from the File menu.
Select the movie you'd like to play on your iPod, then click the Open button. If you haven't yet recorded your movie, see our tutorial onCreating Movies (Mac only).
Step 4
Choose "Export..." from the File menu.
Step 5
Choose "Movie to iPod (320x240)" from the export drop down list and click the Save button.
The Export progress bar shows you how much of the export process is completed. The longer your movie and the larger its frame size, the longer the export will take.
Once the export is complete, QuickTime Pro will place on your Desktop a new version of your movie that will play on the iPod. Double-click the new file and play it to make sure it looks as you expect.
Step 6
To get the movie onto your iPod, launch iTunes 6 (or later). If you do not have it, download iTunes now.
Step 7
Drag your new movie file into your iTunes library in the folder or playlist of your choosing.
Step 8
Attach your iPod to your computer and synch the iPod with iTunes. For detailed synching instructions, see the iPod tutorial. To play the movie on your iPod, select "Videos" then "Movies" from the iPod Main Menu. Movies will be listed here alphabetically. Click on the desired movie to play.


